Showing posts with label DIY. Show all posts

Friday, November 7, 2014

Light Painting in Japanese Shrine - Guest Author Allexandroff on DIY Photography Blog

Image Source: http://www.diyphotography.net/show-light-painting-photo-fushimi-inari-shrine-kyoto-japan/
 
A guest author, who goes by the name Allexandroff, has posted both the results and his process for shooting light painting shots at a famous Japanese shrine.
 
(Click Here) to read about it on diyphotography.net.
 
This makes me think about my next visit to Japan. I always enjoy visiting Japan, and have several favorite places that are a short walk from where I stay in Tokyo. However, I find that the familiarity makes it challenging to get exciting images there. Maybe next time I'll try some night shots, and maybe even some light painting. It could add a new dimension to how I think about photographing these places.
 
DMC-365.blogspot.com
 

Thursday, January 23, 2014

New DIY Camera by Kevin Kadooka - Open Source Plans Available

Image Source: http://www.diyphotography.net/lux-beautiful-waist-level-120-camera-you-can-build-it-too

Kevin Kadooka has published all of the plans, parts lists, and instructions to make your own 120 film camera with electronic shutter. He's also posted sample images, which look pretty darned good.

(Click Here) to read more about the project on DIYPhotography.
 
Kevin's goal in this project is to provide everything necessary for a hacker to make their own camera from all-new parts (no need to steal from old junker cameras). The main structure is to be made on a 3D printer, and the circuit is controlled by the hobbyist microprocessors sold by Arduino (both normal tools for gadget hackers).
 
The assembly instructions look pretty thin to me. For example, I don't see how to either assemble or purchase the electronic shutter; maybe I simply need to look closer. Kevin also indicates that he already has some improvements to make, like allowing access to the battery without disassembling the camera.
 
I think it's really cool that Kevin has put in the work to not only make the prototype, but effectively share how to make one for yourself.
 
I'm tempted to give this a try.
 
DMC-365.blogspot.com


Friday, January 17, 2014

Cheap Pinhole Cameras Can Be A Lot of Fun

I like to play with pinhole photography once in a while. I have a nice 4x5 film pinhole camera that takes pretty decent images. Here's one I love:
4x5 Pinhole Image, by Reed A. George
 
However, there are many less expensive pinhole cameras, including some nice kits where you actually build you own camera out of thick paper. Here's mine, the Kikkerland, which shoots pinhole images on 35mm film:
 
 
With the smaller negative size of 35mm film (as compared to 4x5), you cannot expect the same results. The resulting images are always unsharp, but can still be pretty cool:
Unsharp Knife, by Reed A. George
Kikkerland Paper Pinhole Camera, 35mm Film
 
(Click Here) to read a nice post about another paper pinhole camera, this one a "Sharan," by
Andrea Taurisano on Rangefinder Forum. Several nice images are included.
 
So, if you find yourself obsessing about sensor size, noise reduction, or lens sharpness, grab a cheap little pinhole camera and allow yourself to enjoy a low tech image or two. Works for me!
 
There's a link to the Sharan model on Amazon below. If you feel really adventurous, you can google for DYI pinhole camera ideas.
 
DMC-365.blogspot.com
 

Wednesday, January 8, 2014

DIYPhotography Shows Great Photo Setups With Granite Tile

Still in the process of trying to recover my hard drive after the failed "within Lightroom" transfer process, I'm having to resort to cross-posting a little more than normal. No to worry, I'll be back post some of my own work very soon.
 
(Click Here) to read what happened to me in my file-transfer nightmare; maybe it'll help you avoid the same issues.
 
I saw a great post on DIYPhotography today, about how to use a granite tile as a base for cool product-style photography. Here's the shot that caught my eye:


Image Source: http://www.diyphotography.net/granite-tile
 
(Click Here) to read the full post on diyphotography.net
 
There are lots of good examples in this post, including how to integrate light painting with this style of shooting. Not exactly what you'd want to use for selling products on ebay, but certainly cool. There's another image of a Rolleiflex that I really love.
 
So, if you're bored on a cold winter day, there are certainly some ideas at the link above for you to play around with.
 
DMC-365.blogspot.com
 

Sunday, May 19, 2013

Low Tech Wonders - Kodak Brownie Bullet Comes Back To Life!

I can already hear the questions: "Why, Reed, why? Why would you mess with a junk store camera that shoots film you can't even buy any more?" Well, maybe I'll be able to convince you that it's because it lies right at this interface of technology and art that I love to be in. Even if the tech is low...
Kodak Brownie Bullet Camera
 
Okay. I bought this little Bakelite Kodak camera at an antique store. I paid too much (anything over $2 is too much). But, I'm still happy I did. Read to the end to see the special (hopeful) feature that really convinced me to buy it.
 
The Brownie Bullet was made from 1957-1964. It's final year of production was my birth year. It was designated as a "premium" model, which meant that you had to save up Campbell's soup labels to get one (no joke). It features a plastic Dakon lens, fixed aperture, fixed shutter speed.
 
(Click Here) to read a little more about the Bullet.
 
The Bullet is designed to shoot 127 roll film, which is essentially no longer available. Efke was making it until recently, but they've shut down. You can still buy Efke (iso 100) at Freestyle (Click Here), but it's just running down their stock. There is another company that still advertises 127 film, but they're out of stock.
 
Well, I just couldn't stand to let the Bullet sit without shooting something in it. After an hour or two of turning it different ways and thinking, I found a way to load 35mm film into it. The 35mm film cassette won't fit in the back. I had to unroll the film in the dark, roll it back up more tightly, and insert it into a modified film canister, cut down to fit inside. It worked!
 
But, there was one problem. The Bullet is designed with a curved film plane, which means that the 127 film doesn't lay flat in the camera; it's curved to match the curvature of the image produced by the Dakon lens. So, while I got images from the first roll (which pulled the film flat), they were unfocused in the center. A bonus, though, is that because the 127 film is wider than 35mm, the images were panoramic, and the sprocket holes were exposed. Cool.
 
So, a little more modification was in order. I got some thin plastic material, and through trial and error cut it to the perfect size to fit inside the camera back, under where the film plane should be. It was important that it support the film from under the film plane, to put the film in the right place. Then, I cut a window into the plastic to serve as the image space. Finally, I covered the plastic in black electrical tape, both to reduce light bounce, and to smooth out the rough cut plastic surface.
 
Here's what the mod looks like:
35mm Mask for the Bullet, by Reed A. George
 
This time, I loaded up some iso 800 print film (I noticed that 400 was underexposed, even in daylight outdoors), and tried again.
 
Success! Here are the results. All are shot with the Bullet, all the same (only) aperture and shutter speed.
 
 
Here are some vertical orientation shots:
 
As you can see, I wasn't completely successful in eliminating scratches on the film. But, I'm pretty impressed by what this cheap old camera can do.
 
The hardest part? After finishing a roll, I have to once again open it in the dark, remove the 127 spool that it's now wrapped around, tape it to a leader sticking out of the original 35mm film cassette and wind it back in. Then I just take it to Walgreens, and remember to ask them to not cut the negatives.
 
So, I got my money's worth out of this experience. But, I still don't have an answer for a friend of mine who says "Hey, Reed, if you paid $20 more, could you get a camera that already works?" Yeah, yeah, I could.
 
I don't really understand the exposure. How can it take iso 800 to shoot in the daylight with this camera? 800 speed film sure wasn't there when this camera was made. It has no way to trigger a flash. And I doubt the shutter is faster now than when it was new.
 
I did order some iso 100 film in 127 size from Freestyle, but I honestly don't know how I'll use it. It will be too slow, even in broad daylight.
So, here's a true piece of history that still works.
 
Brownie Bullet
 
Oh, yeah. That hopeful secret? There was still a roll of 127 film in the camera when I opened it up. It was near the end. So, I'm hoping to get a glimpse into the last pictures this camera took before it got stuffed away into a closet or attic. Who knows how long ago that was? Fingers crossed - I'll be sending that roll off to The Darkroom for processing soon.
 
DMC-365.blogspot.com


Sunday, April 21, 2013

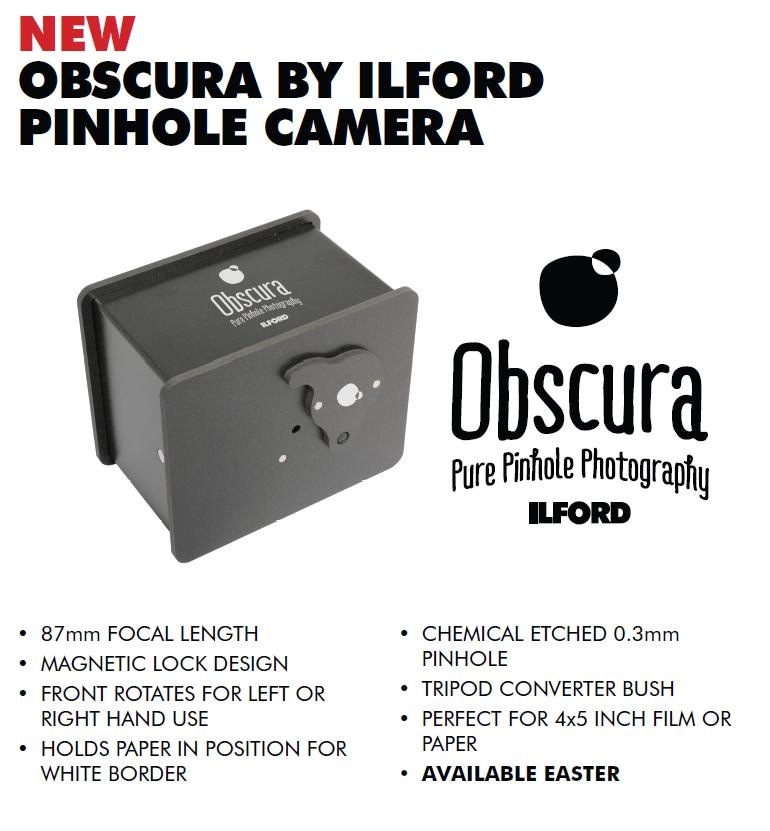
Time For Some Pinhole Shooting - ePHOTOzine's Peter Black Reviews the Ilford Obscura 4x5 Pinhole Camera

Image Source: http://www.filmsnotdead.com/wp-content/uploads/2013/03/20130311-094504-pm.jpg
 
 
I just read a review of a new product from Ilford - a 4x5 film pinhole camera called the Obscura.
 
(Click Here) to read the review on ePHOTOzine.
 
Here's what I learned from the review: 1) Ilford appears to be in the film game for the long haul, which I love, and 2) the Obscura requires film loading in a changing bag, as it doesn't use a normal 4x5 film holder. Wow. That doesn't seem very smart.
 
I have one that I bought used, but I'm pretty sure it's from, you guessed it, pinholecameras.com.
 
(Click Here) to see their website.
 
I'm quite happy with mine, but don't use it often enough. Do I hear inspiration coming on? Maybe.
 
I have also made a cardboard pinhole camera that uses 35mm film. This one is a kit. See the Amazon link below if you're interested in one of those. It's not exactly the same as mine, so I can't say how easy or hard it is to build. Mine was tougher than expected to get right, but it does work and was a fun project.
 
From My Cardboard 35mm Film Pinhole Camera
 
The result above is what you can expect from a 35mm format or smaller pinhole - funky, blurry, potentially fun.
 
I find that my 4x5 pinhole yields reasonably sharp images. Actually, it would be hard to tell a 4x5 pinhole image from one made with an old inexpensive lens. You can decide whether that's a plus or minus. Sometimes funky, blurry, is good.
 
I think I'll load mine up this weekend.
 
DMC-365.blogspot.com


Saturday, April 20, 2013

Skeletons From The Closet - March Results - Rokkaku-Do Temple in Kyoto Shot With Zeiss Ikonta 521/16

Every year when I visit Japan, I make it a goal to get out early in the mornings for some solitude, thought, and photography. This year, I achieved that on our last day in Kyoto, by visiting Rokkaku-Do, a Buddhist temple from the early Heian period. That means it was like constructed before the year 1000 (otherwise known as Y1K to the computer scientists of the time). Rokkaku-Do is in an urban part of Kyoto, and is immediately adjacent to the headquarters of Ikenobo, the association for Ikebana, Japanese flower arrangement. Apparently, Ikebana was started at Rokkaku-Do temple.
 
(Click Here) to read more about Rokkaku-Do temple.
 
I shot in an interesting way on this morning. I carried my Panasonic Lumix DMC-LX7, a tripod, and my Skeletons From The Closet camera for March, the Zeiss Ikonta 521/16.
 
(Click Here) to read more about my Zeiss Ikonta 521/16.
 
I used the LX7 as my exposure meter and scene test camera. Setting it to the same iso as the film in the Zeiss Ikonta, and selecting square image format, I found the LX7 extremely useful in this way. I also have a nice set of LX7 images to compare to the film shots. I plan to do a post about that in the future.
 
I used my DIY paper card rangefinder to just distance for focusing. (Click Here) to read about that. Scroll down to the bottom of the post for a description and link to a very helpful website for making your own rangefinder card.
 
Here are some of the quiet scenes I experienced that morning, scanned and cropped, but otherwise unedited.
 
Dragon Fountain, by Reed A. George
Zeiss Ikonta 521/16 with Tessar f3.5 Lens
 
 
Swan Pond, by Reed A. George
Zeiss Ikonta 521/16 with Tessar f3.5 Lens

Wooden Stool, by Reed A. George

Zeiss Ikonta 521/16 with Tessar f3.5 Lens

I knew that I liked the shot above as soon as I took it.

Symmetry, by Reed A. George

Zeiss Ikonta 521/16 with Tessar f3.5 Lens

That is the hexagonal main hall roof reflected in the water above. Rokkaku means hexagon in Japanese, and is the source of the temple's popular name.
Traveling Monks and Fallen Blossoms, by Reed A. George
Zeiss Ikonta 521/16 with Tessar f3.5 Lens
 
The best part of my morning was when an elderly Japanese lady came by and said good morning to me. Surprised that I could answer in Japanese, she then began my education about Rokkaku-Do.
 
Kami-Sama, by Reed A. George

Zeiss Ikonta 521/16 with Tessar f3.5 Lens (cropped)

 
She spoke only Japanese, so I must admit that I missed a significant part of the lesson. However, I did understand that the stone gods (kami-sama) above were collected from an important path in the area, I believe a path that led between multiple temples. She also told me that old ladies like her knit the hats and aprons for the kami-sama, because they want to make sure they don't get cold out here.
 
If you notice the little white sculptures lined up in front, they are ceramic doves. When I asked her what they were for, she literally took me by the arm, and walked me up to them, telling me how young couples who are in love come here for a specific purpose. She walked with a spring in her step, like a young girl with her boyfriend. She explained to me that a prospective bride can write down the things she likes about her fiance' on a piece of paper, and also list the things she's not so crazy about, putting an X next to those. The paper is then rolled up and put into a special groove in the bottom of the pigeon statue. The gods will work to make the X'd features of her lover go away. I loved that I was able to understand this part, through a combination of halting language on my part, rapid-fire Japanese on hers, and some hand gestures.
 
She also took me inside one of the buildings to explain that Rokkaku-Do was one of 36 stops on the Kansai Kannon pilgramage, where people visit 36 different spots to worship the god Kannon.
 
(Click Here) to read more about the Kansai Kannon pilgrimage.
 
My only regret was that she was too shy to let me take her picture. She politely gave me a wave of the hand, shook her head "no," and quickly moved off. I have said that my goal is not to catch every possible good photograph, but to make sure the ones I do get are the best I can make them. She'll have to be one of the ones I missed.
 
DMC-365.blogspot.com


Tuesday, April 2, 2013

Skeletons From The Closet - March's Camera, the Zeiss Ikonta in the California Desert

Here are some results from March's Skeletons From The Closet (SFTC) camera, the Zeiss Ikonta 521/16 folding medium format camera.
 
(Click Here) to read my post describing this camera.
 
You may have seen my post from a few days back, sharing some pictures I took in the California desert with my Lumix DMC-G3. (Click Here) to see that post.
 
I also shot my Ikonta on that trip, and here are some results. I used Fuji Reala color print film, which gives wonderful muted colors. I find it a refreshing way to shoot the desert, which is typically overdone saturation-wise, in my opinion.
 
Wooden Bones, by Reed A. George
Zeiss Ikonta 521/16 Medium Format Folder with Tessar Lens
Fuji Reala Film
 
Palo Verde, by Reed A. George
Zeiss Ikonta 521/16 Medium Format Folder with Tessar Lens
Fuji Reala Film
Cloudy Desert Morning, by Reed A. George
Zeiss Ikonta 521/16 Medium Format Folder with Tessar Lens
Fuji Reala Film

Ryan Ranch, by Reed A. George
Zeiss Ikonta 521/16 Medium Format Folder with Tessar Lens
Fuji Reala Film
Quiet Corner in Palm Springs, by Reed A. George
Zeiss Ikonta 521/16 Medium Format Folder with Tessar Lens
Fuji Reala Film
 
So, how was using the Ikonta during the month of March? It was delightful! I really enjoy the image quality from this old camera. It is in such great condition, I feel that I'm getting the same type of results that the camera could have provided new - maybe better, since film technology has advanced so far since the 1950s.
 
There are some difficulties, however. For one thing, two out of three rolls I've shot so far have been loosely wound onto the takeup spool. I'm not sure why this is happening, but some of the exposures on the roll shown partially here were affected by light leaking down the edges of the backing film, as it didn't wind tightly onto the takeup spool. I've shot two more rolls since then - the first was fine, but the second also came off loose. I'm keeping my fingers crossed that no light leaked in. Look for more results in a week or so, when my negatives come back from The Darkroom.
 
Other than that, just the "normal" challenges of manual light metering and guess focus. I think guessing the focus distance is the most difficult thing. You can see in the last shot here that I don't always get it just right.
I use a do it yourself card that uses your own stereovision (the fact that your eyes are spaced apart from each other, which allows you to judge distance) to estimate distance. If you have a guess focus camera, you need to make one of these.
 
(Click Here) for a website that helps you to make your own rangefinder card.
 
I made mine double-sided, with distance in feet on one side, meters on the other. I carry this card in my wallet, so it's always with me. Great tool.
 
So, it was a blast shooting the Ikonta in March. But, back into the closet she goes! I'll keep practicing my exposure and focus guessing in April, when I'll be shooting an Agfa Solinette folding 35mm camera. I'll be introducing that camera soon in a new post. Stay tuned.
 
DMC-365.blogspot.com
 

Thursday, January 24, 2013

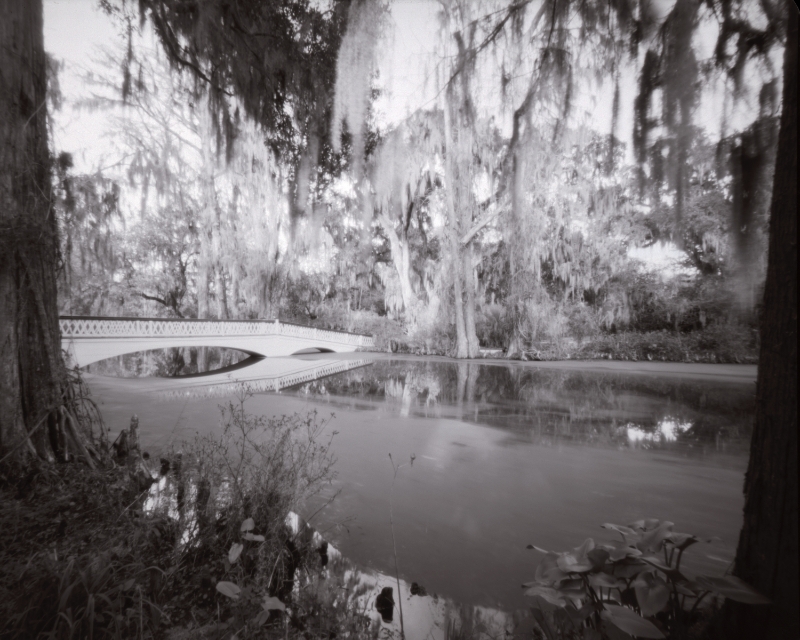
Gorgeous Shot - Magnolia Gardens Bridge by Jon Oman - 8x10 Pinhole Camera

 
Magnolia Gardens Bridge by Jon Oman
8x10 Film, Pinhole Camera
 
I've been thinking about low tech imaging techniques more lately, and even playing around with some plastic fantastic cameras, like the new Lomography Sprocket Rocket that I received as a Christmas present. I also have a nice wooden 4x5 pinhole camera that needs to be used.
 
I found this wonderful shot by Jon Oman, which he posted on Rangefinder Forum.
 
(Click Here) to see Jon's post.
 
I'd love to see a contact print of that giant negative in person. At an exposure time of 5 1/2 minutes, I'm sure the water has a dreamy blurred look to it.
 
(Click Here) to check out Jon's main website.
 
Here's one that I did shoot not too long ago, with a 35mm pinhole camera, which my daughter and I constructed from a cardboard kit. Not nearly the quality of the enormous 8x10 shot above, I still think it's pretty cool.
Reindeer, by Reed A. George
Cardboard 35mm Pinhole Camera
 
DMC-365.blogspot.com