Showing posts with label tripod. Show all posts

Saturday, January 23, 2016

Two More From the Fuji GW690II

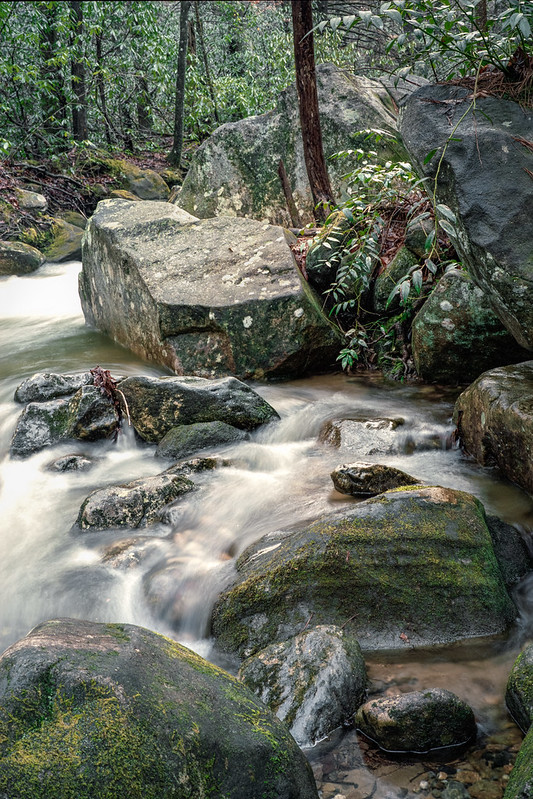
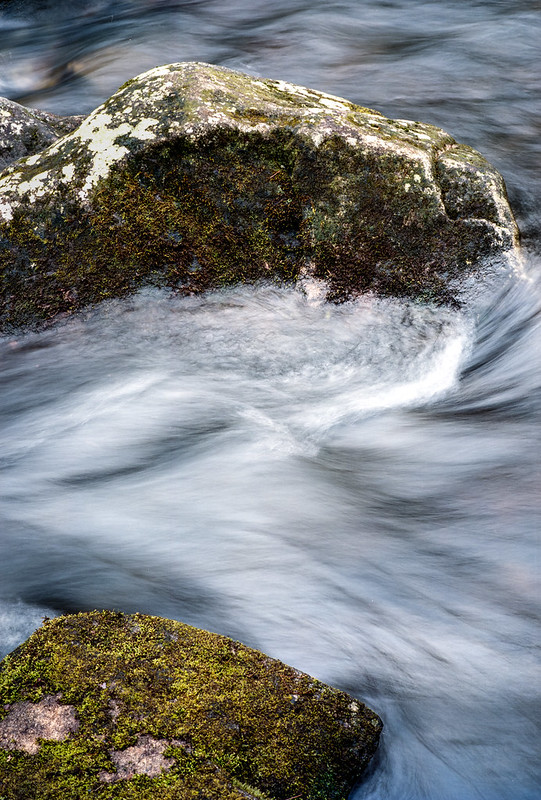
Adding to my last post, with two more 6x9 medium format images from Jones Gap State Park in South Carolina.
This is a detail shot of the water at my feet . To give an idea of the scale, I'd say the rock at top was about six feet away. I love the deep darkness and blue cast in the water
 
 
This image didn't appeal to me at first, but I've grown to appreciate it.
 
Both were shot on Kodak Portra 400. No filters were used.
 
DMC-365.blogspot.com

Sunday, November 29, 2015

Digital Panorama with Nikon Df - Korean War Memorial, Washington, DC

I've been working on my technique for shooting digital panoramas. Today I shot this one, at the Korean War Memorial on the Mall in Washington, DC. I shot it with my Nikon Df, Nikkor 35-70mm f2.8 AF lens at 44mm, f/11. I found the approximate nodal point (ideal point of rotation for panoramic images) by using my gimbal head, usually reserved for the big telephotos. That worked quite well.
 
I am searching for a viewer to allow my blog readers to see it up close and scroll around - the detail in this huge image is amazing.
 
Just for fun, I printed it on my Epson P600 printer with roll paper. In order to get the height to 12 inches, the length of the print is nearly 10 feet! It is really cool to see on paper. I can't do that everyday. The cost of this one print was probably ridiculous. I think it was about $20 in paper, many times that in ink cost.
 
 
If you click on the image, it should take you to flicker, where you can see it bigger.
 
DMC-365.blogspot.com
 

Tuesday, May 26, 2015

Nikon 200-400mm f4 AF-S G VR Lens for Birds - The Warbler

My friend and I have just invested together in a very expensive lens - the Nikkor 200-400mm f4 AF-S G VR (version 1). Last weekend, I took it out in my kayak along with my super-sturdy Gitzo tripod and gimbal head.
 
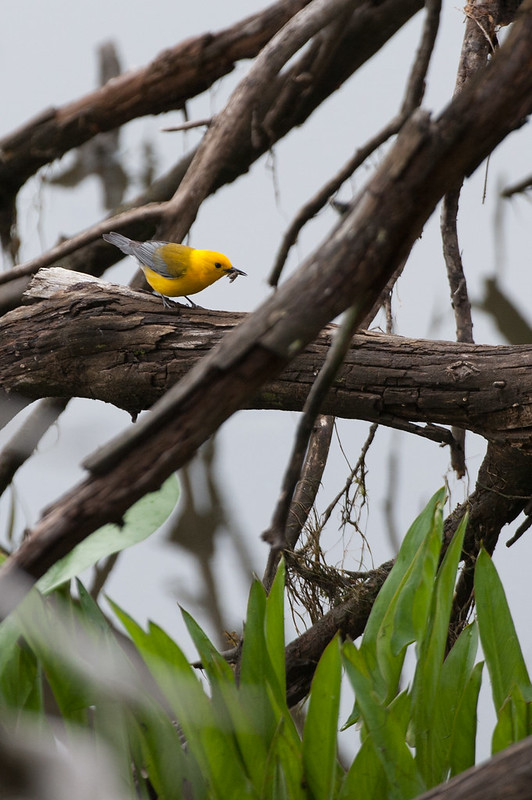
While I was waiting for large birds to fly by where I'd set up the tripod, this colorful little guy showed up.
Prothonotary Warbler, by Reed A. George
Nikon D700, Nikkor 200-400mm f4 AF-S G VR Lens
iso 720, f5, 1/1000 sec.
 
I had the D700 set to auto-ISO, so that I could set a fast (1/1000) shutter speed and the f-stop I wanted, letting the camera adjust ISO. As you can see, the warbler has an insect in his beak, a nice additional feature for the image.
 
Here's another shot of the same warbler.
 
Prothonotary Warbler, by Reed A. George
Nikon D700, Nikkor 200-400mm f4 AF-S G VR Lens
iso 1600, f5, 1/1000 sec.
 
We also purchased the Nikon TCIIE 1.4X teleconverter with our lens. I could have used it here. Both of these shots are cropped from larger compositions (hey, he's a pretty small bird!). I did get a chance to try the lens and converter together. I'll post some of those shots in the coming days.
 
This is one amazing lens.
 
DMC-365.blogspot.com
 

Monday, April 20, 2015

Another Shot at Light Painting Cherry Blossoms with the Nikon Df

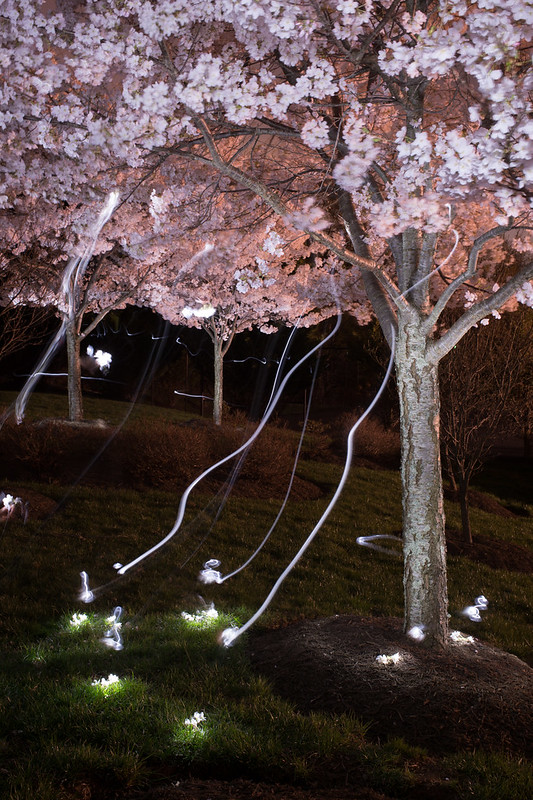
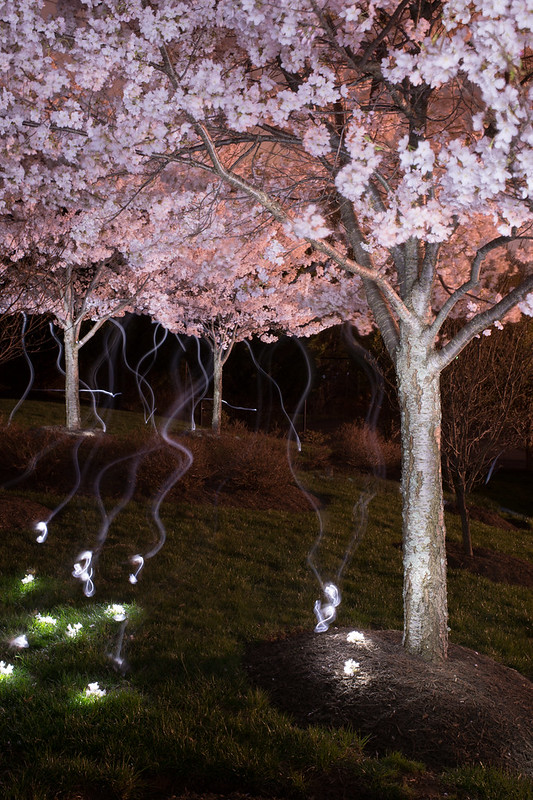
Referring to my post from two days ago, I decided to get back out with the cherry blossoms after dark one more time this year. Fighting my allergies, last remaining vestiges of jet lag from the Japan trip, and worries that my neighbors would wonder why this crazy guy was shining his flashlight up into the trees for an hour or so, I went for it. Here are my favorite light painting shots of the cherry trees this spring.
 
Falling Blossoms #1, by Reed A. George
Nikon Df, Nikkor 35mm f2 AF-D Lens
iso 100, f11, 479 seconds
Falling Blossoms #2, by Reed A. George
Nikon Df, Nikkor 35mm f2 AF-D Lens
iso 100, f11, 357 seconds
 
Yes, it took me 6-8 minutes per shot to do all of the light painting you see here. I had to paint the trunks of all three trees, then the branches. Then, I did the falling blossoms (several per tree). All with one flashlight. I think it was worth it. I feel that I succeeded in making something unique if not beautiful. At least they're not just one more series of straight shots of cherry trees. And through the process, I learned some of what not to do as well as what kind of works in this type of photography.
 
DMC-365.blogspot.com
 

Wednesday, January 28, 2015

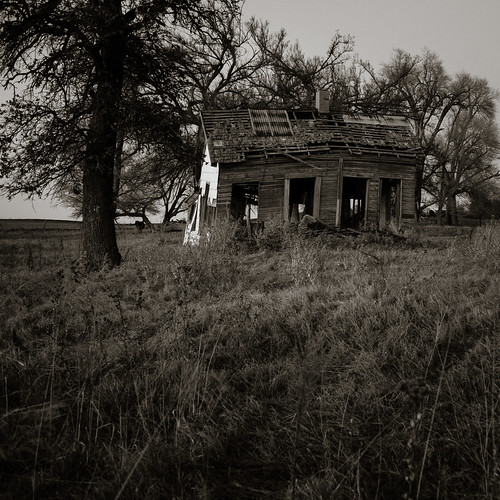
Dusk at the Old Homestead - Outside El Reno, Oklahoma

Nikon Df, Nikkor 35-70mm f2.8 Lens at 35mm
iso 1600, f4, 1/30 sec.
 
I made my trip to Oklahoma with only one lens on the Nikon Df. I must say that I found it slightly limiting, but also liberating. No decisions to make, no fumbling to change lenses.
 
I made this shot right after sundown. I couldn't find the right spot for my tripod, as I was shooting from the roadside, and there was a fence in the way. So, I cranked the Df up to 1600 (no problem at all for this camera), leaned on a fencepost, and shot.
 
Can you imagine the stories this old place could tell?
 
DMC-365.blogspot.com
 

Monday, July 14, 2014

Bug Closeups with the Micro 4/3 Panasonic-Leica 45mm f2.8 Macro Elmarit

I have had the Pana-Leica 45mm f2.8 Macro Elmarit lens for quite some time. When I purchased it, the Macro-Elmarit was the only medium telephoto available for the Micro 4/3 mount. Had the Olympus 45mm f1.8 been out at the time, I probably would have bought that instead.
The extra >1 f-stop of the Olympus would be nice. That said, the macro ability of the Pana-Leica is great. I like to be able to take closeups of details when I travel.
I have not really explored the capabilities of this lens in more classical macro applications. Yesterday, I had the time and opportunity to go bug hunting while my wife practiced free swimming in a local quarry. I decided to see what the Macro-Elmarit could do. So, I mounted it on my Panasonic Lumix DMC-GX7, set up the touch screen to focus and trigger exposure (I rarely use the touch screen features of the GX7), and connected my Nissin flash with a remote cord. Having mounted the camera on a sturdy tripod, I was ready to go.
Well, it was hot, and the bug hunting was a little tough. After waiting an eternity (okay, about 30 minutes) for a gorgeous dragonfly to return to a particular perch to no avail, I started stalking. By the way, dragonflies usually will come back to exactly the same spot over and over. I think maybe I was just too close for comfort. This is where a longer macro focal length would come in handy, giving me more working distance.
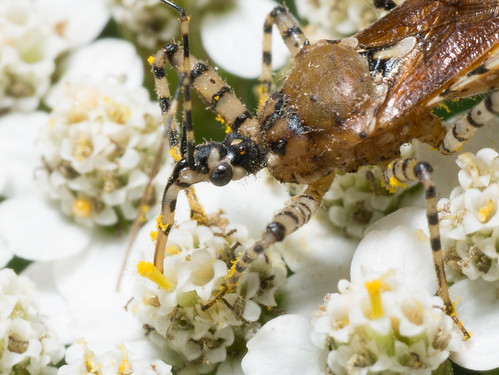
My stalking actually resulted in finding a stationary dragonfly, but my best subject of the day was this bug you see below. I'm not sure of his exact species, but guess that he's part of the hemiptera family of true bugs.
Bug, by Reed A. George
Panasonic Lumix DMC-GX7, Pana-Leica 45mm f2.8 Macro Elmarit, Remote Flash
iso 200, f11 1/100 sec.
 
I used a mini softbox mounted on the flash head, and handheld the flash. Even with the camera on a tripod, I had too many things to hold, and the flash-to-subject distance wasn't well controlled with my hand holding method. I should work on mounting the flash to a bracket if I continue this line of imaging. I did use the touch screen to identify where to focus and trigger the exposure. I must admit it's a pretty cool tool, as long as the camera is held stationary. It was a little difficult to get the focus point just right, on the bug's head, at this magnification. But, I did get it a few times.
 
I was not at the closest focus distance of the lens, but was at about the shortest useful working distance for this subject. Here's a 100% enlargement of the same image (a little clarity and sharpness applied in Lightroom):
 
100% Crop of Image Above
 
So, I'd say this lens is pretty capable in the true macro realm. I don't shoot a lot of nature macro images like this, and would normally tend toward the large sensor of my Nikon D700, and either my true macro 60mm Micro-Nikkor f2.8, or a longer lens (say 105mm f2.5) with extension tubes. The longer lens would make the working distance more reasonable. Now I know that the Micro 4/3 sensor in my GX7 and Macro-Elmarit are quite capable in this realm.
 
On top of that, the Macro-Elmarit is a reasonably good portrait lens (limited in its shallow depth of field potential by the relatively small maximum aperture of f2.8), and an excellent lens for capturing closeup details when on travel.
 
DMC-365.blogspot.com

Sunday, June 29, 2014

Belizean Sunrise

I got my butt out of bed at 5AM this morning to catch the sunrise here in Belize. I shot several images, and plan to work on them when I get home, including a plan to try some subtle high dynamic range (HDR) processing. Here's one that I like pretty much as-is:
Belizean Sunrise, by Reed A. George
Panasonic Lumix DMC-GX1, Lumix 20mm f1.7 Lens with 3-Stop ND Filter
iso 160, f16, 1 sec.
 
I liked how the shoreline formed an S-curve, ending at the thatched dock shelter at the horizon. I edited this image in Snapseed on my iPad.
 
More to come.
 
DMC-365.blogspot.com
 

Monday, February 10, 2014

Rolleicord / Rolleikin Portraits - Buddhist Monk

I've written about the Rolleikin attachment for my Rolleicord TLR, which allows me to shoot 35mm film in it. With the 75mm f3.5 Tessar and 35mm film in portrait orientation, the camera is quite useful for shooting portraits.
 
(Click Here) to read a little about the Rolleicord and Rolleikin.
 
I've started a new project, with a focus on contemplation and meditation. For some time now, I've been attending meditation class at our local Buddhist temple, led by Achaan Edward. He has just moved to a new temple, and I'm exploring both the inward concepts of meditation and the external setting of his new location, in the beautiful Virginia hills.
 
For one session, I decided to photograph Achaan Edward meditating, with the Rolleicord. Here are my favorite results, all shot on Kodak TMax 400 film:
 
For the shot above, I used a reflector on the floor to help even out the glow from sunlight coming in the side window.
Achaan Edward, by Reed A. George
 
As far as using the Rolleicord goes, I have some things to improve. Many of my images from this roll were not so sharp. Based on the fact that nothing in the affected images was sharp, I'm tending to think it was motion blur. I was shooting at ~1/50 of a second, handheld. A tripod was in order. Also, the shutter release mechanism on the Rolleicord is different from my Rolleiflexes. Instead of a simple button, the Rolleicord uses a lever to both load and release the shutter. I think I probably tend to move the camera when using this unfamiliar mechanism. So, a remote release may be useful, even when I'm shooting handheld.
 
The ground glass on the Rolleicord is a little dim. With my aging eyes, it's also a little hard to find the right focus point. But, I think most of my problems were associated with camera motion.
 
All that said, I'm quite pleased with these particular images. I believe they'll be up on the temple's new webpage quite soon.
 
DMC-365.blogspot.com


Thursday, August 22, 2013

Creepy Shot With the Whole Lotta Leica August Lens - Summicron 35mm f2 Version 3

 
Confederate Dead, by Reed A. George
Leica M9, Leica Summicron 35mm f2 Lens Version 3
iso 160, f13, 1/30 sec.
 
I took the day off today, and drove out to the Shenandoah National Park for some hiking and photography. It was a foggy morning. On the way out, I passed by the Groveton Confederate Cemetery at the Manassas National Battlefield. I walked around the cemetery a little with my M9 and tripod, and made a few shots. I almost missed this one.
 
On the way back to my car, I started looking more closely at the numerous spider webs in the tall grass. Finally, I put it together in my mind, and decided to find a nice one in front of the iron cemetery fence. This one was in a very good spot, in my opinion.
 
I converted the image to monochrome using SilverEfex Pro 2. I also selected a selenium tone, which is uncommon for me. Creepy effect, huh?
 
DMC-365.blogspot.com


Sunday, January 20, 2013

Shanghai's Yuyuan Garden Tea House at Night by Adam Allegro

 
Shanghai's Yuyuan Garden Tea House by Adam Allegro
Image Source: http://catchthejiffy.com/2013/01/09/yuyuan-garden-district-at-night/
 
I'm on the hunt for new and inspiring photography blogs. There are a lot out there. I just found Adam Allegro's "Catch the Jiffy" blog, with amazing travel photography.
 
(Click Here) to go to Catch the Jiffy
 
Adam is a Nikon shooter, and explains his equipment choice on his blog (link above). He has a real talent for night photography, and uses the awesome Nikon D800 to great advantage.
 
This guy gets around a lot. So, he may be a source for more of my "travel photos from places I've never been" in the future.
 
Enjoy his site!
 
DMC-365.blogspot.com


Tuesday, January 15, 2013

gotak from Mu-43.com Shares a Cold Toronto Winter Morning


Mu-43.com member gotak has posted some images taken in Toronto this winter, all between the hours of 5:00-9:00 am. These were shot on the Olympus OM-D.
 
(Click Here) to see them all on mu-43.com, including the iced-over docks at Toronto Harbor.
 
gotak tells us that the OM-D was a lightweight selection, and that it was good, since the icy docks come with some danger of slipping into the water.
 
These pictures make me feel cold just looking at them. Slide into that water, and it's all over, I'm afraid.
 
It's nice to see some images from so early in the morning - definitely not your average tourist shots. The OM-D seems to do quite well with long exposures.
 
DMC-365.blogspot.com


Tuesday, July 24, 2012

Inspiration Requires Patience

 
I just read an excellent piece on Kirk Tuck's Visual Science Lab regarding how patience leads to inspiration in photography. His example is a commercial shoot of water treatment facilities.
 
(Click Here) to read Kirk's thoughts on the subject.
 
I once found a very sad and interesting place, a Mennonite Cemetery in Oklahoma,on the site where their church used to stand. It is now an open field, with only a few headstones, and the old church stairs.
 
 
Mennonite Church Stairs, by Reed A. George
Nikon D700, Nikkor 24mm f2.8D Lens
iso 400, f2.8, 1/100 sec
 
It is a sad place, in my opinion. These people were buried near their church, a place that felt like home to them. The church has been moved and restored, which is nice, I suppose. But, the graves are now left in this desolate place.
 
Anyway, this was an example of when it took me a good hour on the site to begin to capture pictures that I hope share how I feel about the place. This was no "swoop in, shoot it, be gone" situation. My tripod was a necessity to allow me to think and compose. Somehow in the end, it worked.
 
Sunset Over Mennonite Cemetery, by Reed A. George
Nikon D700, Nikkor 24mm f2.8D Lens
iso 400, f2.8, 1/2000 sec
 
 
Unknown Mennonite Grave Marker, by Reed A. George
Nikon D700, Nikkor 50mm f1.2 AIS Manual Focus Lens
iso 400, f2, 1/500 sec
 
DMC-365.blogspot.com


Friday, June 15, 2012

Mike Johnston of The Online Photographer Shares Some Lumix DMC-GF1 Shots of the Abandoned Pabst Brewery

 
Abandoned Pabst Brewery in Milwaukee, by Mike Johnston of the Online Photographer
Image Source: http://theonlinephotographer.typepad.com/the_online_photographer/2012/05/the-abandoned-pabst-brewery.html?utm_source=feedburner&utm_medium=feed&utm_campaign=Feed%3A+typepad%2FZSjz+%28The+Online+Photographer%29

Mike Johnston of the Online Photographer has posted some great images from an abandoned Pabst beer brewery in Milwaukee, WI, USA.

(Click Here) to see Mike's post on the Online Photographer blog.

Mike's images were shot with the Panasonic Lumix DMC-GF1 at iso1600 - a real stretch in terms of image quality for that camera. Of course, at the resolution of small online images, they sure look great. Mike reports that the noise would make printing of them pretty tough.

Mike toured the building with photographer Jack MacDonough, and includes a shot of Jack working with his Leica S2 on a tripod in his post. That's Mike's favorite of the bunch; it's my favorite, too.

We have all made the mistake of going to a great location without a tripod. Mike made that mistake (admittedly), but pulled through pretty well with his GF1, if you ask me.

I've written in the past about the photographic allure of abandoned places and things.
(Click Here) to see my last post on the subject.

The subject still intrigues me.

DMC-365.blogspot.com
 

Monday, May 21, 2012

A Little Diversion from Lumix - Bird Photography With Nikon D700

 
Ospreys, by Reed A. George
Osprey (Pandion Haliaetus), by Reed A. George
Nikon D700, 300mm f4 AF-IF Nikkor
iso1600, f5.6, 1/1000 sec


The images in this post are the best few from three separate kayaking trips along the Potomac here in Northern Virginia. Bird photography is a very specialized business. While I did gain a few nice images with the G3 and 100-300mm Lumix, my very best images happened to be with my Nikon D700. So, pardon the break from Lumix, but I wanted to share these.


Osprey, by Reed A. George
Osprey (Pandion Haliaetus), by Reed A. George
Nikon D700, 500mm f4 AIS Nikkor (Manual Focus)
iso1600, f5.6, 1/1000 sec


Osprey (Pandion Haliaetus) Catching Shad, by Reed A. George
Nikon D700, 500mm f4 AIS Nikkor (Manual Focus)
iso1600, f5.6, 1/1000 sec

It's interesting fitting a Nikkor 500mm f4 AIS lens, big heavy Gitzo tripod, and all my other gear into a 10 foot kayak. But, as long as the winds are not heavy, it works.

The Eastern Kingbird (Tyrannus tyrannus) below just showed up while I was set up to shoot the ospreys. I really like the branch as a compositional element in this shot.


Eastern Kingbird (Tyrannus tyrannus), by Reed A. George
Nikon D700, 500mm f4 AIS Nikkor (Manual Focus)
iso1600, f5.6, 1/500 sec
 
It's good to have a lot of interests; that's never been a problem for me. Kayaking, birdwatching, and photography came together in this case. Great fun!
 
DMC-365.blogspot.com


Friday, April 20, 2012

On Critical Focus, by Tesselator of GetDPI


Image Source: http://forum.getdpi.com/forum/4-3rds-cameras/35591-achieving-critical-focus.html
Tesselator's DMC-GH1 and Worn Manual Focus Assist Button
Forum member Tesselator on GetDPI posted a recent entry about achieving critical focus. Interestingly, while he uses legacy manual focus lenses almost exclusively, and does not own a single native Micro 4/3 lens, he is a dedicated Lumix DMC-GH1 user. Apparently, he's on his fourth unit.
(Click Here) to see Tesselator's post on Get DPI.
It turns out that Tesselator achieves astonishingly sharp focus not through any tricks or technologies; it seems he's just plain obsessive about careful focus and camera stabilization. The only kind of new tip he shares is using the automatic magnification for assisting manual focus that is available on the Lumix 4/3 cameras. In fact, you can see how he has worn the label on the button away through constant use, in the image above (small button to the left of "Menu/Set").
In this post, Tesselator also describes his extensive use of tripods. This is something we all need to hear again, once in a while. Of course, we all know that tripods are required for ultimate sharpness. But, it sure is easy to leave it at home.
I found it useful to read his experiences, including those with vintage Linhof tripods. I hope you find something useful in his post, as well.
DMC-365.blogspot.com
 
 
DMC-365.blogspot.com
 
DMC-365.blogspot.com
 

Thursday, April 12, 2012

Hey Mister, What's in the Bag? Or, What I Took on My Spring Vacation

So, I got into Micro 4/3 camera gear in large part due to the compactness of the system. I used to carry around a very heavy bag of Nikon gear, which consisted of one body and a few lenses, flash, etc. Because I didn't want to be changing lenses in the field all the time, and could only carry one body, I depended largely on zooms, usually with one fast normal prime along for the ride.
 
So, what has Micro 4/3 done for me in terms of my travel kit? Maybe this will give you an idea:
 
Reed's Travel Kit

My Travel Kit - LowePro CompuTrekker AW,
Giottos MT9241 Tripod, Velbon QHD-41 Mini Ballhead

While this is the same backpack I used with Nikon, what I carry inside, and the resulting weight, is very different. Being able to use a small travel tripod and mini ballhead is an immediate advantage of lightweight camera equipment.

Here's what's inside:


Travel Kit, Exploded

Let's see here:
  • Panasonic Lumix DMC-G3 bodies (2X), batteries (4x)
  • Panasonic Lumix 14-140 f4-5.8 zoom
  • Panasonic Lumix 14mm f2.5
  • Pana-Leica 25mm f1.4 Summilux
  • Pana-Leica 45mm f2.8 Macro-Elmarit
  • Panasonic 46mm filters (2X - 1 Polarizer, 1 3 stop ND)
  • Nissin Di466 flash
  • Panasonic Lumix DMC-LX5, batteries (3X)
  • Panasonic Lumix DMC-TS3 waterproof camera, batteries (2X)
  • LowePro Messenger Bag (fits inside Computrekker AW)
  • Mountainsmith Camera Cube (padded divider pack, fits inside messenger bag)
  • Panasonic remote shutter release
  • Apple iPad2
  • Shutterhat camera rain protector
  • Hakuba mini-tripod
  • SD cards, pen and paper, passports, etc.
All of this together, including the Giottos tripod, weighs in at 19 lbs. I don't have a weight for the Nikon pack, but imagine it's quite a bit more.

While this pack is not exactly lightweight, there is significant capability and redundancy here. For a big, expensive trip, that's what I want. Having two interchangeable lens bodies makes me much more comfortable. Not only that, it allows me to shoot mostly with primes, which I really prefer. I found on this trip that I kept the 25mm Summilux on one of the G3s, and alternated between the 14mm and 45mm on the other. I only used the zoom a couple of times, when I wanted longer reach than the 45mm would afford.

What would I leave out if I were going again tomorrow? Not much, actually. I would probably leave out the LX5, but that said, I did use it exclusively for a day of family activities. Yes, I could have used one of the other cameras, but the LX5 sure is a great balance of size and capability. I may leave out the flash. I don't use flash a lot, and they do weigh quite a bit, especially with an extra set of batteries. I might leave out the 14-140 zoom.

The fact that the padded messenger bag fits inside the Computrekker is great. That allows me to only be a packhorse for the whole kit when I'm making major moves between hotels, etc. Once on location, I can put just what I need in the messenger bag, and travel much more lightly.

The DMC-TS3 turned out to be fun on this trip, as I did shoot a few underwater pics. I'll post those in the coming days.

So, I hope you can see that I have a lot more capability with Micro 4/3, at reasonable carrying weight. If I were to limit it to one body, a couple of zooms, and a single fast prime, it would really be a lightweight kit. Sometimes, while my back is aching, I do feel that I challenged myself to fill the volume of the Computrekker.

What do you think? Am I over-prepared for an overseas one week trip? Under-prepared? What would you pack differently? I'm always interested to learn from others.
 
DMC-365.blogspot.com

Sunday, March 25, 2012

And The Weather Report Told Me To Stay Inside! Cherry Blossoms in Washington, DC.

 
Jefferson Memorial, Cherry Blossoms, by Reed A. George
Jefferson Memorial, by Reed A. George
Panasonic Lumix DMC-G3, Pana-Leica 25mm Summilux f1.4
iso160, f11, 0.3 sec
 
Well, it is a rainy weekend here in Washington, DC. But, I knew that overcast weather would make for some nice diffuse lighting. And, since I will be out of town soon, I don't have many more opportunities to see the cherry blossoms in DC this year. So, I decided to brave the weather, and be there at sunrise. I hope you'll agree that the trip was worth it.
 
By the way, it is the 100th anniversary of the original gift of cherry trees from Japan.
 
 
DC Cherry Blossoms, by Reed A. George
Cherry Blossoms, by Reed A. George
Panasonic Lumix DMC-G3, Pana-Leica 45mm Macro_Elmarit f2.8
iso400, f4, 1/30 sec

The foggy morning light really allowed the subtle colors of the cherry blossoms to pop. In fact, I had to tone them down a little in post-processing, as they looked a little cartoonish to me.


DC Cherry Blossoms, by Reed A. George
Cherry Blossom Bouquet, by Reed A. George
Panasonic Lumix DMC-G3, Lumix 14mm f2.5
iso160, f2.5, 1/40 sec

I think the image above is my favorite of the morning. Those blossoms on the tree trunk were completely natural, but looked like a florist had arranged them there. Of course, as I was shooting it, another photographer walked right up with his DSLR and snapped it over my shoulder. Oh well, I guess I don't own DC, do I? Actually, I hope he got a nice shot.


Petals in the Tidal Basin, by Reed A. George
Panasonic Lumix DMC-G3, Lumix 14mm f2.5
iso160, f16, 1 sec
 
In the shot above, the water looked very grungy. So, I changed the white balance a little blue to compensate; I may have gone too far.
 
 
Contrasting Reds, by Reed A. George
Panasonic Lumix DMC-G3, Lumix 14-140mm f4-5.8 at 140mm
iso400, f5.8, 1/50 sec

In the image above, I enjoy the way the tree trunks in the boke in the background form a leading line. Without that, this image would be very flat.


Vintage DC Postcard, by Reed A. George
Vintage Postcard Look, by Reed A. George
Panasonic Lumix DMC-TS3, "Pinhole Camera" scene mode
On Camera Flash, iso640, f5, 1/60 sec

I also took the opportunity to play with the DMC-TS3 this morning, using a preset called "Pinhole Camera." This made the image have a dark vignette around the edges, which I replaced in Lightroom with white. I like the effect. Not to be used every day, but kind of cool in this case.
 
 
Subtle Pinks, by Reed A. George
Soft Pinks, by Reed A. George
Panasonic Lumix DMC-G3, Pana-Leica 45mm Macro_Elmarit f2.8
iso400, f2.8, 1/500 sec

I like how this image shows blossoms that range from right at their peak bloom to those already missing their petals. I also love the soft pink colors, and the nice out of focus areas. That is why I chose this as the closer for this post.

I sure am glad I didn't listen to the weather report's advice! This was a couple of hours well-spent.

DMC-365.blogspot.com


Monday, January 23, 2012

A Couple of Examples From the Fossil Shoot

In my earlier post today, I showed the setup I used to start photographing the fossil samples at the Calvert Marine Museum.  I thought it may be useful to show a couple of examples of the images taken.

Keep in mind, these are for scientific and not artistic purposes.  They were shot in the smallest file size available on the Nikon D700 (2,128 X 1,416 pixels) in order to save time and storage space.  I did my best to optimize the lighting to show the features of the specimens, using cross-lighting with two flashes.
Conradostrea Sp., Image 1
Conradostrea Sp., Image 2
Panopea Americana, Image 1
 Panopea Americana, Image 2

DMC-365.blogspot.com

Photographing Fossils for the Calvert Marine Museum

I spent the weekend fighting off a cold and photographing the extensive fossil collection at the Calvert Marine Museum in Solomons, Maryland.  As you will see below, my Lumix kit has not supplanted my Nikon D700 for this type of work.  I shoot the D700 tethered through Lightroom, and use the excellent Nikkor 60mm f2.8 AF-D Micro lens almost exclusively.

The two shots below, however, were taken with the Lumix DMC-G3 and 14mm f2.5.  You can see the Nikon inverted above the fossil.
Lumix Shoots Nikon Shooting Fossils
John Nance and I, Photographing Fossils
Lumix DMC-G3, 14mm f2.5, iso160, f8, 1 sec

In order to get these shots, I set up the DMC-G3 with a remote shutter release, prefocused, and with a 10 second timer.  I then I triggered the DMC-G3, waited until I heard the shutter open (after the 10 second timer), then triggered the Nikon D700 remotely, to get the Nikon flashes to go.  I like the way they came out.
Lumix Shoots Nikon Shooting Fossils
This is one of just me.  Same settings as above.

Did I mention that the museum's collection is extensive?  How does 40,000 samples sound?  We covered maybe 10% this weekend.  Good thing it's fun and interesting!

DMC-365.blogspot.com 

Saturday, January 21, 2012

I Admit It, I like HDR

HDR Reveals Detail in the Shadows, Kauai Ficus Tree
This is What My Eyes Saw; the Camera Couldn't See it All in One Exposure
HDR Image of Ficus Tree, Kauai, Hawaii
Lumix DMC-LX5, iso80, 35mm equiv full-frame focal length
Three exposures, processed with Nik HDR Efex Pro
 
High Dynamic Range (HDR) is a technique that combines brightness levels from multiple images of the same scene, to produce a single image with a wider apparent dynamic range, which means that details are not lost in shadows or very bright areas.  Used correctly, it can reveal detail that is visible to the human eye, but not within the capture range of a camera sensor.
 
HDR is frequently over-used and over-processed, which can lead to a very artificial look.  If that's what the photographer intended, okay.  But, in many cases, it just looks like someone went on a trip to computer game animation world.
 
Here is a nice online article from Peter Tellone on the B&H Photo blog:
 
I learned about HDR in an excellent workshop at a Leica Historical Society of America (LHSA) meeting.  Our instructor, Dr. Stephen Wright, did a great job of demonstrating the technique.  The LHSA is probably not the most technically progressive group in the world; they tend toward more traditional approaches and fewer buttons and controls.  However, many of us saw HDR as an extension of what the best cameras can provide.
 
If you are interested, the software I use is Nik Efex Pro.  It is available at Amazon:
 
I hope you will find this useful.  HDR really can make a challenging, high contrast lighting situation into something you'll be proud to show.  Just don't overdo it!
 
DMC-365.blogspot.com